
 |
| Koko komeus tässä! ~~~ My pretties from this course! |
Taas oltiin lasihelmiä tekemässä, jo toisen kerran (ensimmäisen kerran postaus täällä)! Paikkana oli taas tuttu Pyhäjärviseudun kansalaisopisto ja opettajana jo viime kerralta tuttu Lea Schwantz. Tälläkään kertaa kurssi ei varsinaisesti keskittynyt historiallisiin helmiin, mutta itse ajattelin vähän viime kertaa enemmän panostaa asiaan -nyt kun aivan perusteet olivat jo hallussa päin. Eihän sitä yhden kurssin perusteella parhaalla tahdollakaan itseään kovin taitavaksi voinut sanoa, mutta pitipä koittaa muutamia historiallisen oloisia tekniikoita kun kerran tilaisuus oli. Joten tässä näitä omia tekeleitä ja niille historiallisia verrokkeja, noihin pyrittiin.
And again we headed off to make some glass beads, for the second time now (post about the first tries here)! Our teacher was the same as last time, the skilled Lea Schwantz. It also remained unchanged that the course did not focus on historical glass bead making techniques, but since I had already gotten a little glimpse on what the basics on glass bead making are, I decided to focus more on more historical-looking beads. Although I could by no means call mysef an expert after one course, and not even after this second one, but I decided to try my hand on making some historical-ish looking beads now that I had a chance. So here are the beads I made, and some actual historical examples -I was aiming for those, more or less.
Yksiväriset ~~~ Single coloured beads

| Sinisiä yksivärisiä lasihelmiä viikinkiajalta Pöytyältä. ~~~~ Blue undecorated viking age beads from Pöytyä, SW Finland. Kuva/photo Finna. |
No näitähän tuli tehtyä aika nippu jo viimeksi eikä ketään varmasti yllätä, että nämä olivat jo aikoinaan niitä yleisimpiä -yksinkertaisia tarvitaan, että monimutkaisemmat pääsisivät esille (vaikka moderni estetiikka ei välttämättä olekaan ihan yksi yhteen muinaisen kanssa), ja löytöjen valossa näyttää siltä että jopa koko helminauhan koostaminen yksivärisistä on aivan käypä ratkaisu. Muotoasioista muuten havaintona, että siinä missä normaalisti helmestä muotoilematta tulee palleroisen pyöreä, varsin monet etenkin Suomen rautakautiset helmet ovat vähän muotoiltuja ja litteitä, hieman sylinterimäisiä.
Well, I made quite a few of these last time too, and I assume no-one is really surprised to find that these were the most common type of beads even back in the Iron age. After all, one needs simple beads to make the complicated ones stand out more (although modern aestheetics and Iron age concept of what looks good are not necessarily one and the same), and when it comes to finds, it seems that it's a completely valid choice too to use only single-coloured beads for one's necklace or other string of beads. When it comes to the shape of beads, normally without any shaping the beads end up round-ish but quite a few Finnish iron age beads are slightly shaped, more flat, rather like cylinder-shaped.
Melonihelmet ~~~ Melon beads

| Viikinkiaikainen ,melonihelmi Pöytyältä. ~~~ Viking age melon bead from Pöytyä, SW Finland. Kuva/photo Finna |
Kermanvaalea lasi käyttäytyi varsin erikoisesti, vaikka se oli puikkona ja vielä sulatettunakin kermanvaalea, valmiina helmenä se oli kehittänyt ikänkuin punaista "ruostetta". Tätä olisi voinut käyttää hyödyksi jos olisi etukäteen tietänyt, mutta noin odottamattomana värinmuutoksena se aiheutti vähän päänvaivaa. Mutta näin siis tällä kertaa, ei voi materiaalin käytöstä näemmä täysin ennustaa. Muodon puolesta kuitenkin tuli aika tavalla sitä mitä piti. Nämä omat yksilöni ovat jopa vähän leveitä verrattuna historiallisiin melonihelmiin, mutta niitä tunnetaan melko tavalla eri leveyksisiä, myös Suomesta. Kuviointi tapahtuu tökkimällä uria pehmeään lasiin, omassa tapauksessani hyvinkin paljon ruuvimeisseliä muistuttavaa työkalua käyttäen. Tarkkahan siinä saa olla, lasi kun kovettuu hyvinkin nopeasti kun sen ottaa liekistä pois, joten urat on syytä saada kohdilleen nopeasti. Vaikka ainahan toki voi uudelleenlämmittää ja muotoilla uusiksi, mutta yhden kohdan korjaamiseen se ei oikein sovellu.
The cream coloured glass showed some curious behaviour, it was nice and solid offwhite in colour when in rod and even when heated, but once finished it seemed as if it had developed some kind of red "rust". This could've been exploited if one had been aware of it in the first place. Well, one cannot always fully predict on how material behaves... But when it comes to shapes, these ended up quite a lot like they were intended. These ones that I made are quite wide when one compares these to the actual historical examples, they come in several sizes starting from very narrow flower-like beads -these kinds have been found in Finland too as well as wider ones. The shaping takes place when the glass is still hot and soft, one pokes the soft glass with a metal tool which in my case looked quite a lot like a screwdriver. One needs some precision as glass hardens again quite fast-the shaping needs to be done quickly and accurately! Of course one can re-heat and reshape the bead, but that's not really a suitable method for fixing a single detail.
Pistekoristeet ~~~ Dot decorations

 |
| Ravattulan Ristimäen komeassa helminauhassa on myös pistekoristelu edustettuna. ~~~The handsome necklace from Ravattula Ristimäki also features a bead with dotted decoration. Kuva/photo Ristimäen blogi. |
Tätä kuviointitapaa opiskeltiin jo viime kerralla, ja koska lopputulos on kiva ja kuviointitapa yksinkertainen, pitihän vastaavia tehdä tälläkin kertaa. Tosin edellä manattu kermanvaalea lasi teki tepposet tässäkin joten kaikki pistekuviot eivät näkyneet ihan niin kuin olisi ollut kiva... Historiallisessa mielessä pistekuvioihin -yksinä tai kaksinkertaisiin pisteisiin- törmää myös usein, eikä se kai ole mikään erityisempi ihme sillä se on varmaan yksinkertaisin mahdollinen kuviointitapa -ohuen ohuella lasipuikolla tökkäistään helmen pintaa ja riippuen siitä halutaanko pisteen olevan muun helmen tasalla vai koholla, sitä joko lämmitetään siitä kohtaa tai ei. Yksinkertaista ja mukavaa.
This type of decoration was familiar from the previous course. And because it is a simple method of decoration and I like the outcome, I just had to do beads like these again! Although the cream coloured glass caused some minor trouble in here too and on occasion the contrast isn't as big as I intended it to be... Historically speaking, dotted decoration is one of the most common ones, be they one dot or concentric dots. And that's no wonder since it's also one of the most simple forms of decorating a glass bead -one needs a thin glass rod (called a stringer), heats it, pokes gently the surface of a glass bead with it and depending on if one wants the dot to be pronounced or even with the rest of the surface, heats it again or not. Simple and fun!
Höyhenkuviot ~~~ Feather patterns

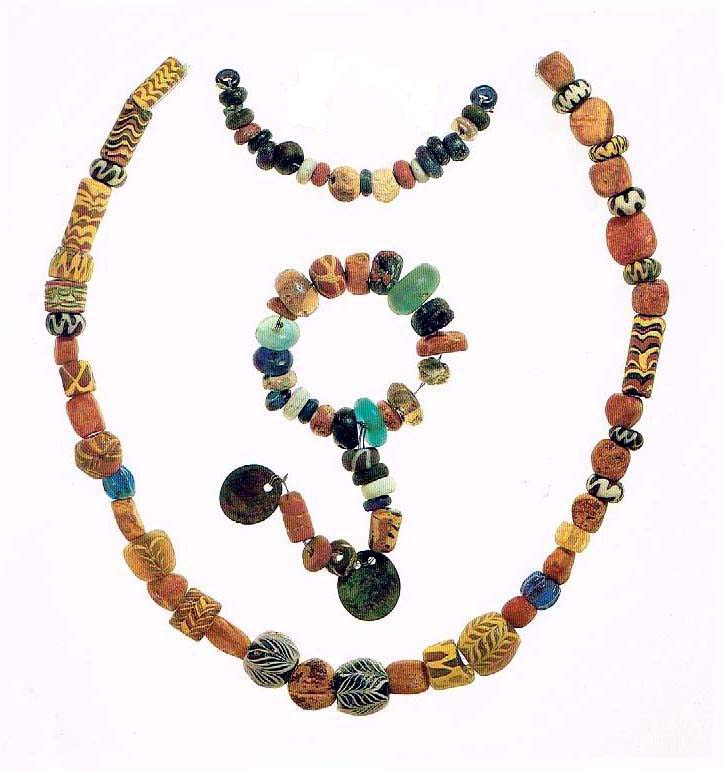 |
| Saksilainen kaulanauha ja rannekoru 500-luvulta ~~~ Saxon necklace and bracelet, 6th century. Kuva/photo Hampshire archaeology |
Tämä oli ihan uutta tällä kertaa! Opettaja näytti miten aikaansaadaan hieman höyhenmäistä kuviota, ja sehän oli mukavaa. Tämä kuviointityyli vaan on kovin harvinainen Suomen rautakaudella ja myös viikinkiajan Skandinaviassa (toisaalta taas jonkin verran aiemmin Englannissa niitä sitten taas tuntuu olleen varsin runsaasti). Pohjoisessa jopa siinä määrin harvinainen että jos tarkasti suomalaistyylistä omaa helminauhaani olisin nyt koostamassa, tällä tavalla kuvioituja helmiä mukaan pääsisi ehkä yksi tai jos kaikkein tyypillisintä haetaan, ei välttämättä ehkä sitäkään. (Sikäli hirmuisen harmi että tämä on ihana kuvio!) Edit: Kuulemma Saksan alueella tätä löytyy myös viikinkiajalta.
Kuvioinnin tekeminen olikin sitten yllättävän yksinkertaista vaikka prosessi olikin melko monivaiheinen. Pohjana oli pitkulainen, sylinterinmuotoinen helmi, joka saatiin aikaan tekemällä ensin kaksi tavallista helmeä aivan kiinni toisiinsa, sulattamalla niitä hiukan yhteen ja lopulta muotoilemalla grafiittilevyä vasten tasaiseksi pötköksi. Kuvionti aloitettiin vetämällä ohuella lasilangalla kontrastivärisiä raitoja helmen pintaan pitkittäissuuntaisesti ja sitten vetämällä ura niiden poikki metallitikulla. Tasoitus vielä liekin lämmössä, ehkä ja kuvio olikin valmis! Omissa siis kuvio tuli yhdellä uranvedolla, mutta alla olevasta kuvasta voisi päätellä että eri suuntiin vetämällä saisi varsin nättiä jälkeä myös eikä pohjahelmen tarvitse olla pötkylä.
This was totally new! Our teacher showed how a feather shaped(ish) decoration is made, and that was indeed fun! This type of decoration is quite rare in iron age Finland and also in viking age Scandinavia (but in Saxon England it seems to have been quite common). In the north it seems to have been so rare, that if I was constructing my own Finnish-style late iron age necklace atm, perhaps I would add one bead decorated like this but no more, if the aim was to create something that's most typical, perhaps even that one "feather" decorated bead would be too much. Which is slightly unfortunate, because I love this type of decoration (but the beads surely will find their uses, no doubt about that!). Edit: A friend told me that there are beads like this found in Viking age Germany.
Making of said decoration was a process with several stages, but all in all it was quite simple. A cylindrical bead was the base, it was created by making two "regular" beads very close to another and then shaping them by rolling them lightly on a graphite paddle. The actual decoration was formed by drawing contrast coloured lines with a thin glass rod lengthwise to the bead's surface, and then by using a metal pin drawing a line across those lines, horizontally. Some warming and perhaps little re-shaping and it's done! That's at least how it was done in my beads, but looking at the lower pic, one can spot that the base doesn't need to be cylindrical and although in my beads the metal pin lines were drawn only once, one can just as well draw several lines to different directions and get very pretty results.
This was totally new! Our teacher showed how a feather shaped(ish) decoration is made, and that was indeed fun! This type of decoration is quite rare in iron age Finland and also in viking age Scandinavia (but in Saxon England it seems to have been quite common). In the north it seems to have been so rare, that if I was constructing my own Finnish-style late iron age necklace atm, perhaps I would add one bead decorated like this but no more, if the aim was to create something that's most typical, perhaps even that one "feather" decorated bead would be too much. Which is slightly unfortunate, because I love this type of decoration (but the beads surely will find their uses, no doubt about that!). Edit: A friend told me that there are beads like this found in Viking age Germany.
Making of said decoration was a process with several stages, but all in all it was quite simple. A cylindrical bead was the base, it was created by making two "regular" beads very close to another and then shaping them by rolling them lightly on a graphite paddle. The actual decoration was formed by drawing contrast coloured lines with a thin glass rod lengthwise to the bead's surface, and then by using a metal pin drawing a line across those lines, horizontally. Some warming and perhaps little re-shaping and it's done! That's at least how it was done in my beads, but looking at the lower pic, one can spot that the base doesn't need to be cylindrical and although in my beads the metal pin lines were drawn only once, one can just as well draw several lines to different directions and get very pretty results.


